What is Power BI?
Power BI is a cloud-based business analytics service that enables:
- 360° view of your business;
- fast and easy access to your data;
- data discovery and exploration;
- insights from any device;
- collaboration across your organisation;
- anyone to visualise and analyse data.
In this article, we are going to look at the various reports that Power BI can deliver, to provide robust intelligence to drive decision making. You may like to read more on how Microsoft brings business intelligence and big data together.
Dynamics 365 Business Central Power BI Apps
-
Dynamics 365 Business Central – Sales
- Sales Dashboard
- Excel Template View Company
- Power BI Report Labels
-
Dynamics 365 Business Central – CRM
- Sales Opportunities
- Excel Template View Company
- Power BI Report Labels
-
Dynamics 365 Business Central – Finance
- PowerBI Finance
- Excel Template View Company
- Power BI Report Labels

Power BI in Business Central
Power BI reports are embedded in Business Central. This means all of the content packs PLUS any other Power BI reports are available in Dynamics 365 Business Central. When a user first opens Business Central, of a specific company, the system will attempt to automatically deploy the above content packs. This is assuming Power BI has been used previously for the user. If not, a message similar to below will appear:
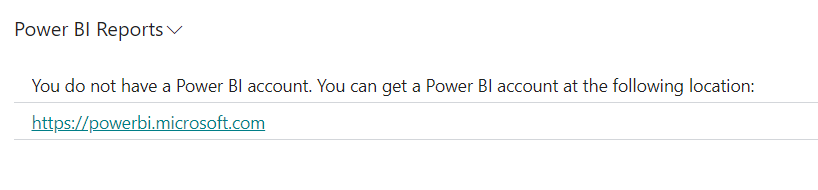
You will simply need to sign up.
How to sign up?
https://powerbi.microsoft.com
• Select the ‘Sign up’ option
• Enter your work email address
• Complete the sign up process.
Power BI Desktop is a Free version. It will let you create reports and publish them to your individual Power BI account. It is essentially for individual use. When you start to use this as an organisation and to take advantage of advanced features, then you need to use the Power Bi Pro version, which is a paid version ($13.70 per user per month, there is a NFP discount)
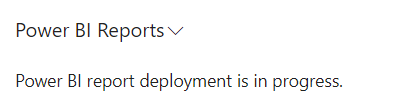
The key difference is the Pro version will let you collaborate and share reports and organisational content packs or “apps”. Also schedule reports, which can email a snapshot of a dashboard or report when the dataset refreshes. When you sign in again to Business Central, then the system will attempt to deploy the content packs again.
If you see a message like below, that is a good sign!
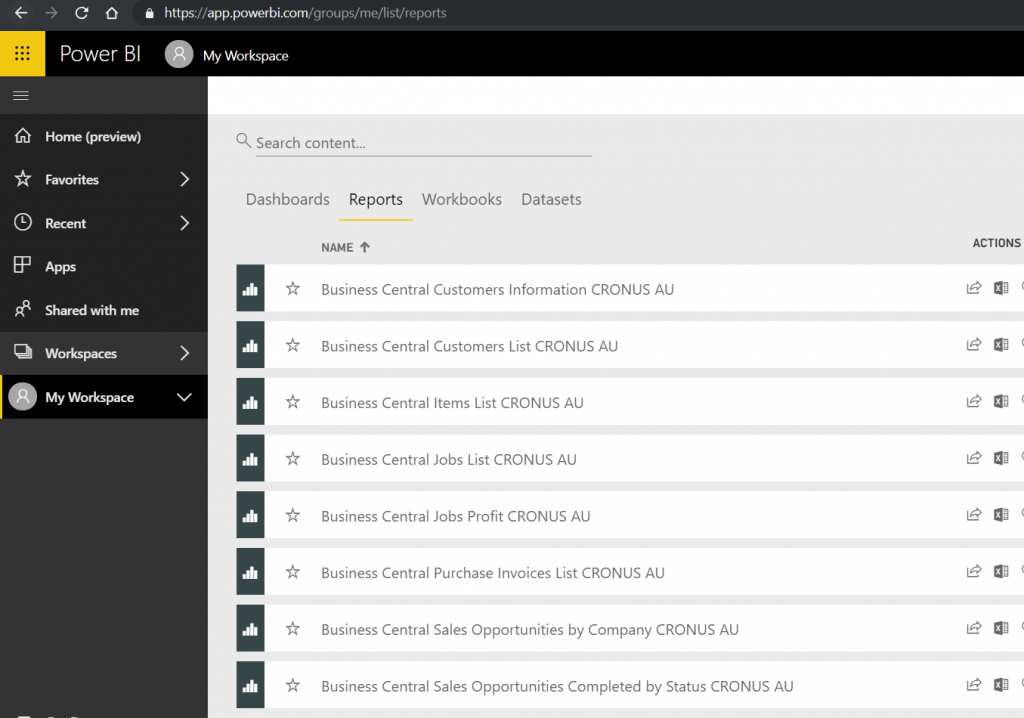
You can check the status by signing in to Power BI. You should see a list of reports like this:
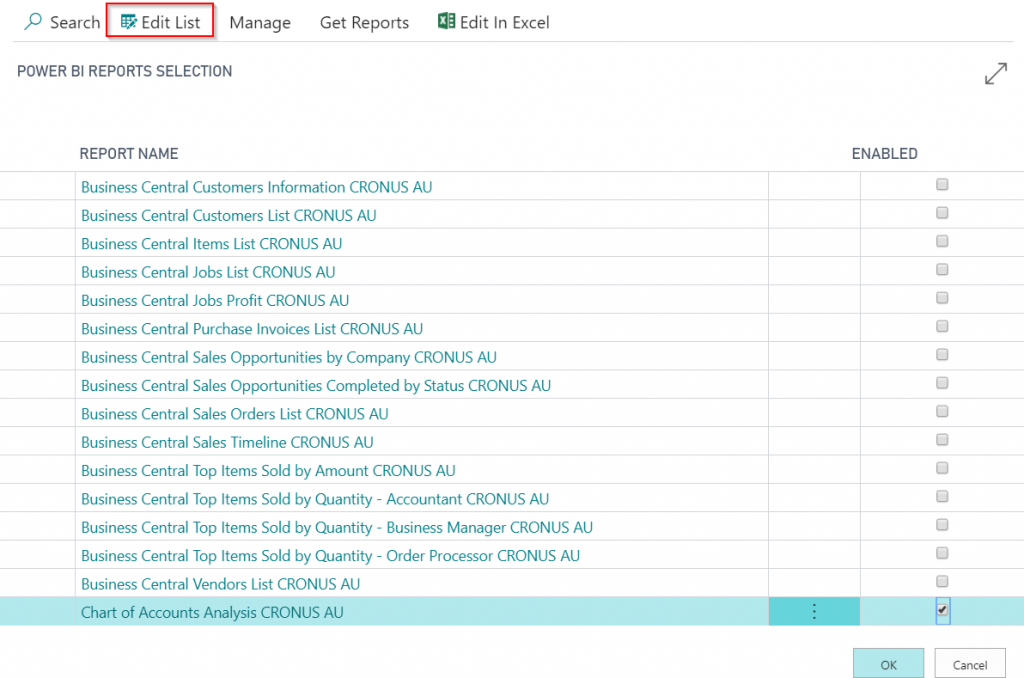
When you sign back in to BC, if you see a message that no reports are enabled you can choose to Select Report.
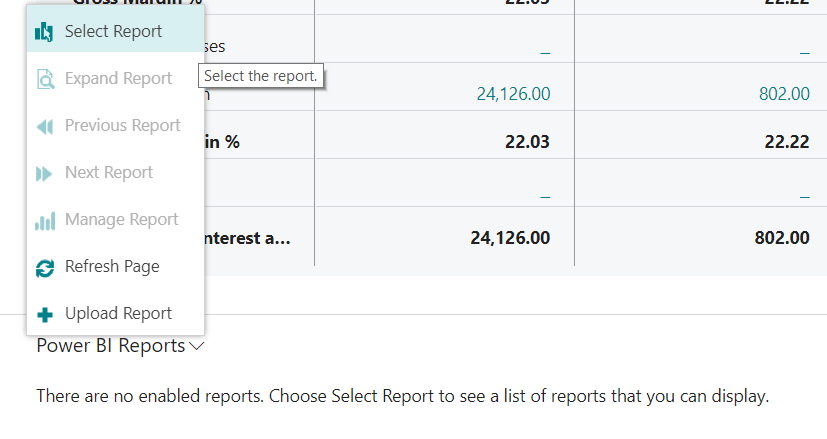
Then from this list, you can select Edit List, then tick the reports you want to be able to select from the Role Centre. (don’t choose the List report)

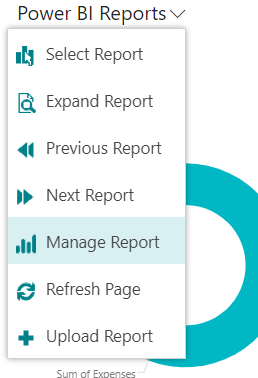
Once enabled you can see the report, from the menu you can choose more options, such as to expand the report, or even Manage report, which will let you Edit the report.
Keep in mind, that these reports are automatically maintained, so a new version may be published if there has been an update. This will create a duplicate report.
Each report is saved at an individual user level. This is why they are “Free” reports, and you don’t need the Pro version to view them.
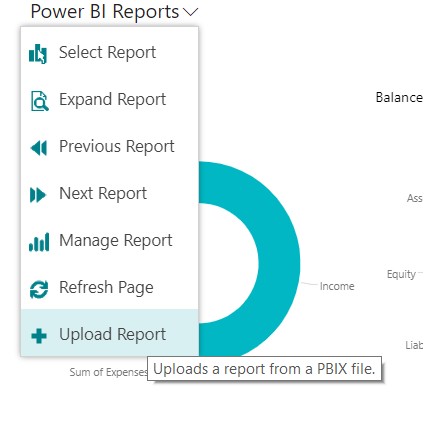
If you design your own report, using the Power BI Desktop application, then you can save the .PBIX file, and then as an Admin user, you can “Upload” directly into NAV and it will automatically share a copy of this to ALL users in BC. You cannot control who gets access to the report using this method.
If a user edits the report, it only affects their own copy.
Connect your data in Power BI
Connecting data sources in Power BI is not as complicated as it might seem. Today, we’re looking at connecting your Business Central Data.
- Open your browser, navigate to https://powerbi.microsoft.com, and sign into your account.
- Select Get Data at the bottom of the left navigation pane. You can also get there starting from within Business Central. From your Home page, navigate to Report Selection in the Power BI section. Select either Service or My Organisation from the ribbon. When either of these actions are selected, you will be taken to either the Organisation gallery in Power BI or to Microsoft AppSource, which will also be filtered to only display apps related to Business Central.
- In the Services box, select Get. This will open a page displaying AppSource and Apps for Power BI.
- Select Apps from the Apps for Power BI tab, choose the Microsoft Dynamics 365 Business Central app that you want to use, and then select Get it now.
- When prompted, enter the name of the environment and company in your Business Central app that you want to connect to. If you have not created multiple environments, enter Production. For the company parameter, ensure you are entering the name and not the display name. You can find the company name in the Companies page in your Business Central instance.
- Once connected, a dashboard and reports are added to your Power BI workspace. When completed, the tiles show data from your Business Central company.

Editor’s Note: This post was first published in December 2018. It has been updated with the most recent information for accuracy and comprehensiveness.
Discover how PowerBI can help your organisation
Was this article helpful?

Daniel Argus is NFP Division Manager at EBS. Daniel has extensive experience with Microsoft Dynamics 365 Business Central and Dynamics NAV implementations, providing training to multiple users and onsite support and guidance.